
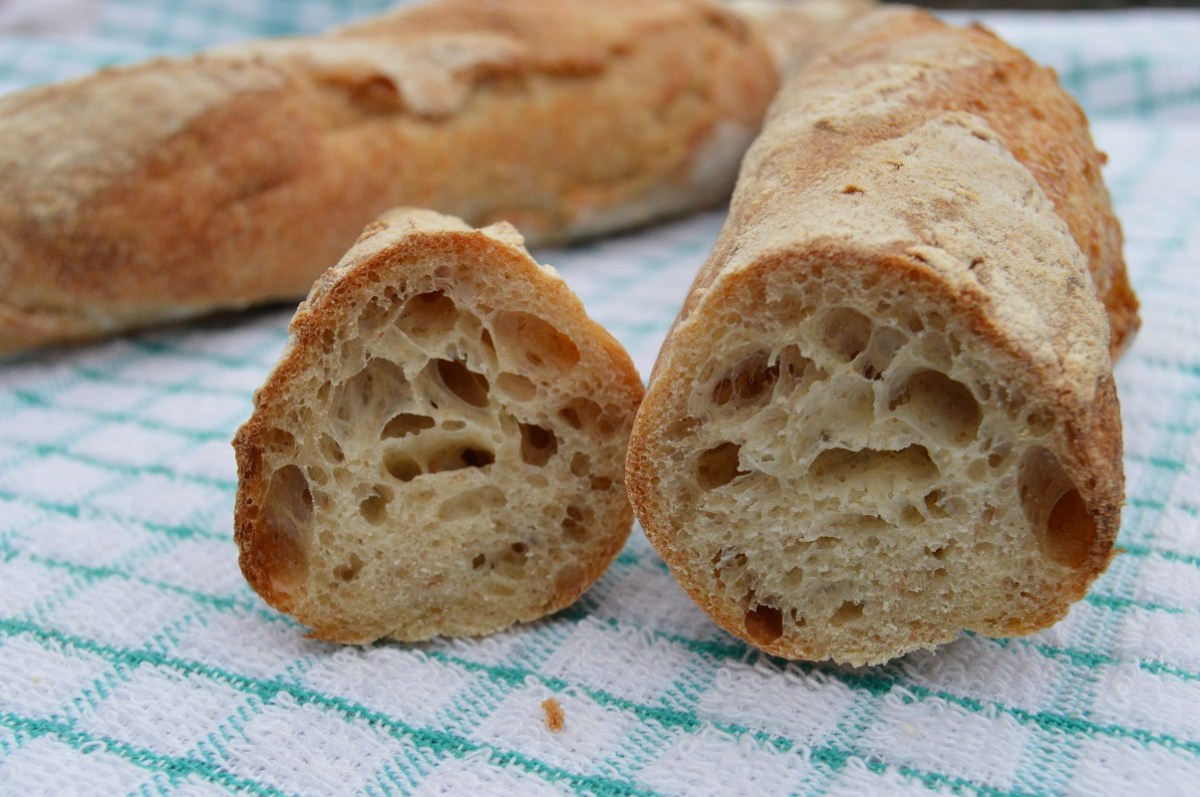
If you want shatteringly crisp baguettes with depth of flavour and an open crumb, this will tick all those boxes. This is a real artisanal bread and is a joy because of its lack of fuss!

These baguettes, based on a recipe by Anis Bouabsa, are a joy: a crunchy crust, a soft aerated interior and a rich, almost creamy flavour with a slight natural sweetness. Real complexities of flavour – a far cry from using a standard bread dough shaped into baguettes!

This dough uses very little yeast (a mere 1/4 teaspoon per 500g flour, which is 0.6g if you have microscales!) but don’t worry about the tiny amount of yeast – it really works! And the very slow fermentation in the fridge does wonders for the flavour of the final bread.
I’ve adapted the recipe to incorporate wholemeal flour and I have increased the water content.
The approach: stretching & folding
This method goes for much stretching and folding, to give a better, open bread structure. You essentially grab a handful from one end of the dough and pull it until it almost pulls apart from the main bulk of the dough. Then fold it back over the main bulk of the dough before rotating the bowl, grabbing another handful and repeating, for about a minute.
You then leave the dough to rest for about 20 minutes before repeating this process 3-4 more times, ending up with a very soft, shiny dough that has a light, bouncy and almost marshmallow-like texture.
The stretching and folding develops the gluten noticeably with subsequent bursts of stretches and folds, and is a great way to deal with a wet dough. Even after the cool, slow fermentation, after which the dough looks somewhat slack, a couple of stretch and folds brings it back to a tighter dough that is more easily shaped.
It might seem a bit of a pain with all the stretching and folding, but it is incredibly easy, and the very hands-on approach makes this a theraputic and rewarding process; the results really do speak for themselves – the taste is truly amazing. Seriously, if you like bread then you have got to make these baguettes.

Shaping
This amount of dough will make 4 baguettes, using about 225g dough each.
Once the dough has been divided into pieces of the desired size, you shape each one:
- pat the dough into a rough rectangle on a very lightly floured surface trying not to knock out too much of the air. You can also gently stretch it lengthwise
- lightly roll up the dough to give a cylinder and, with the seam underneath, gently roll each cylinder on the worktop in the flour: ideally work from the centre towards the outside to get the length
- ideally, apply a little more pressure towards the ends so that they taper a little
- lift onto floured couches or baguette trays
Alternatively, just stretch out each piece of dough to a rough cylinder, dust well with flour and lift onto the baguette trays/couches.
Baguette trays
While I sometimes use floured linen couches for my baguettes, I find it easier with these baguettes to use metal baguette trays – the ones with small holes along them. Purists might shriek – and let them! – but the trays work brilliantly. I place a strip of non-stick greaseproof along the trays, though, just to prevent the baguettes from sticking to the trays.
Scoring:
The scoring/slashing of the dough not only makes the baked baguettes look appealing, it helps control the expansion of the dough in the oven.
Without the scoring – and it is not essential – the dough will bulge up in the oven and rupture in random places: which I actually quite like!


You need a very sharp, clean blade for scoring and a light dusting of flour on the dough: a razor blade is ideal. As the dough is quite soft, owing to the high water content, it can be something of a challenge to score successfully without tearing the dough apart and collapsing it a little, but to be honest, if the cuts are not as clean as they should be, or if the dough tears a little, then fear not: the baguettes will still be magnificent.
It is important to be quick with the blade: don’t even think about it – just slash and bake. Even better if you can make long parallel slashes on the diagonal, slightly overlapping (as in the photo below)

Recipe: baguettes (makes 4)

- 420g strong white bread flour
- 80g wholemeal flour
- 1/4 teaspoon or 0.6g dried easy-blend yeast (honestly, you only need this small amount!)
- 10g fine sea salt
- 400ml water (you can get away with about 350ml if you want a firmer dough, but the baguettes will not be as aerated inside)
(1) Mix the flours and yeast together. Add the water and mix enough to form a very wet dough that feels quite unmanageable. Cover and leave for 30 minutes and then sprinkle over the salt. Mix the salt into the dough by grabbing a handful of the dough, stretching it out of the bowl, before folding it back onto the dough a few times. Repeat this stretching and folding for a couple of minutes then cover and leave for about 20-30 minutes. NB: the dough will be very sticky but this is essential for the final baguettes you get. After a few stretches and folds you will feel the dough cohere more, with later stretches and folds bringing the whole piece of dough out of the bowl with it.
(2) Stretch and fold for another couple of minutes; cover and leave for 20 minutes.
(3) Stretch and fold again for another couple of minutes. Cover and leave for 20 minutes.
(4) Do a final stretch and fold session for a couple of minutes. Phew! But really, there is actually very little to do!
(5) Cover the dough and put in the fridge for 24 hours (or up to 48 hours) to very slowly ferment. The dough will have risen a little. Remove from the fridge and leave it, still covered, at room temperature for an hour.
(6) Turn out onto a floured surface, cut into four equal portions and shape: see above. If the dough feels too unworkable, just shape to a rough cylinder as best as you can, dust well with flour and lift onto the baguette trays. It will all be perfect once baked! Leave uncovered at room temperature for an hour: they will not double in size but you will get significant oven spring.


(7) During this proving, preheat oven to its highest setting and place a solid baking tray on the bottom of the oven. Once proved, dust the tops lightly with flour and score the shaped dough with a sharp knife or blade. If the scoring doesn’t quite work, really do not worry: just bake them as they are.


(8) Pour cold water or throw a handful of ice cubes into the baking tray to create steam and bake for about 10 minutes before turning down the oven to 220C (fan) and baking for a further 15 -20 minutes until they turn a deep golden brown colour.


Looks amazing. I can feel the crunchy crust even from the photos! 🙂
LikeLike
The crust is great. And it was such a surprise to have the most minute amount of yeast yet delivering results that are better than those made with typical amounts of yeast. I love investigating different approaches and when they work it is even more exciting.
LikeLike
wow these are fantastic baguettes. I made up a batch, baked them last night and they are top quality baguettes. I am now going to try this approach with a loaf
LikeLike
It does work wonderfully for loaves, especially free-formed ones such as boules etc…
LikeLike