
With its light sponge, its generous hint of vanilla and chocolate and its tangy cream cheese and white chocolate vanilla icing, this red velvet cake – with very little food colouring – is seriously good for any occasion.
I am something of a latecomer to red velvet cakes, initially put off by some scarily lurid red sponges with something of a horrid after-taste that can come from the inclusion of too much food colouring.
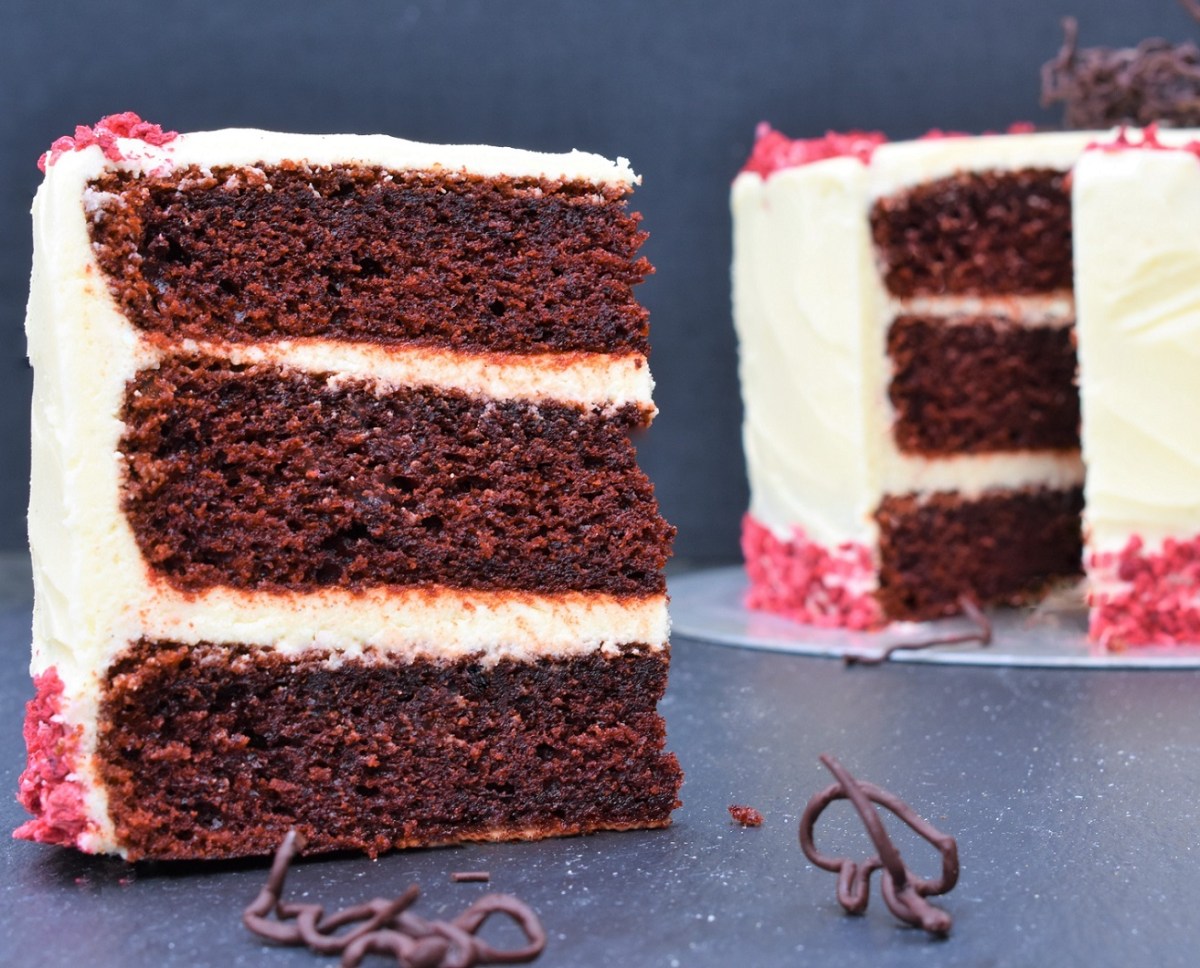
The sponge with this cake is not the shockingly synthetic red that screams radioactive, but is instead a much deeper red: almost rust-like in colour.
 Red velvet cake
Cocoa powder
I prefer to use raw cocoa powder as it has a much better depth of chocolatey flavour and gives a slightly deeper colour to the sponge.
The coffee – little more than a splash of espresso – enhances the chocolate flavour of the sponge, without the cake tasting of coffee: not that that would be a bad thing in my book!

Freeze-dried raspberries
I am such a fan of freeze-dried fruit (raspberries and strawberries being the two I use the most). They make a great, simple decoration to any cakes, macarons and the like, adding a wonderfully intense fruit flavour.
Most supermarkets sell freeze-dried raspberries and strawberries in small tubes, but I often buy larger packets of them online where it is much cheaper.

A note on food colouring
Whenever I use food colouring – which is rarely in cakes and occasionally for macaron shells – I much prefer to use powdered colours: you need just a little powder to give a good colour effect.
You can use puréed red fruits such as raspberries in the sponge to add a hint of red (but more crucially flavour) but too much and the sponge can become a denser affair rather than light-as-air.
However, there are some good gels that work very well without the need to use much and risk that unpleasant after-taste effect!
About the recipe:
This is my adaptation of a recipe by Georgina Hayden. It is a lovely recipe as it is, but I wanted more of a chocolate hit so I have increased the proportion of cocoa powder.
I have also made a few other tweaks here and there – not least the addition of white chocolate in the icing. This adds even more lusciousness, but without the icing becoming too sweet.

The inclusion of dried raspberries, both in the sponge and to decorate, gives little bursts of sweet tang. The raspberries also add natural vibrancy to the look of the cake.
When making the cake, there might seem to be a lot of faffing about when it comes to incorporating them, but it really doesn’t take long and it results in the most wonderfully moist sponge that you just don’t quite get if you mix it all together in one go!
That said, I have made this by mixing it all together in one go and it has still given a lovely cake: not quite as light, but still a cake that will see no left-overs!
Recipe: red velvet cake – makes one deep 7” cake

For the cake
- 150g plain flour
- 40g raw cocoa powder
- 1 tablespoon freeze-dried raspberry pieces
- 1/2 teaspoon fine sea salt
- 1 level teaspoon bicarbonate of soda
- 50ml espresso coffee, cooled
- 160ml buttermilk
- 2 teaspoons red wine vinegar
- 160ml vegetable oil
- 200g caster sugar
- 1 level teaspoon powdered red food colouring or use a couple of teaspoons of good gel colouring
- 2 teaspoons vanilla bean paste
- 2 medium free-range eggs, at room temperature
For the filling and topping:
- 150g very soft unsalted butter
- 150g icing sugar, sifted
- 250g full-fat cream cheese, drained of excess liquid
- 1 teaspoon vanilla bean paste
- 80g melted white chocolate, cooled but not set
To finish:
- about 50g dark chocolate, grated or melted and shaped in any way
- a few more freeze-dried raspberry pieces
(1) Preheat the oven to 160C (fan). Grease three 7” sandwich tins and line the bases with greaseproof.
(2) Sift the flour, salt, bicarbonate of soda and cocoa into a medium bowl and stir in the dried raspberries: this dry mixture will be incorporated a bit at a time.
(3) Mix the buttermilk, coffee and vinegar in a jug and set aside.
(4) Pour the oil into a large mixing bowl and add the sugar, vanilla and red food colouring. Whisk together for 2-3 minutes using an electric whisk or until it goes smooth and meringue-like in consistency and the grains of sugar have dissolved. Everything else will be added to this bowl in stages.
(5) Add the eggs to this bowl one at a time, whisking well after each one until they are fully incorporated.
(6) Whisk about a third of the flour mixture into the mixing bowl for a few moments, just until the flour is incorporated.
(7) Whisk half of the buttermilk mixture into the mixing bowl for a few seconds.
(8) Whisk another third of the flour mixture into the mixing bowl for a few seconds – again, just until the flour is incorporated.
(9) Whisk the rest of the buttermilk mixture into the mixing bowl for a few seconds until incorporated.
(10) Finally fold the rest of the flour mixture into the bowl and pour this cake mixture into the tins: it will be like a fairly thick batter. Bake for about 20-25 minutes: the surface should be bouncy and the cakes should be just shrinking from the sides of the tins.
(11) Leave to cool in the tins for about 10-15 minutes before turning the cakes out onto a cooling rack.

(12) For the icing, beat the butter, vanilla and icing sugar for a few minutes until very light. Add the cream cheese and the white chocolate, and beat well to incorporate. Chill until needed.
(13) Use about half of the icing to sandwich the sponges together. Use the rest to spread on top and sides of the cake.
(14) Finish with a sprinkling of the raspberry pieces and grated/melted/shaped chocolate on top.


This looks delicious… I often skip the red food colour and add pureed beetroots or strawberries…This has a lovely colour…
LikeLiked by 1 person
My girlfriend absolutely loooves Red Velvet Cake! 🎂
LikeLike