

A gorgeous bread, with real flavour, this is a few notches above the supermarket artisinal breads – and it can be made for a fraction of the cost. Great just as it is with butter and jam but wonderful toasted for breakfast. The simplest of life’s pleasures!

Pre-ferment:
This is pretty much a standard recipe that can be found anywhere, but I have altered proportions of rye flour a little. I do like to make up and use a pre-ferment: some of the yeast, flour and water is mixed the day before and is allowed to ferment fully, thereby developing flavour before being mixed into the main dough.
Seriosuly, using a pre-ferment really does make a huge difference to the final flavour of the bread.
Let the dough rise/prove in a cool place!
Proving the bread at cool room temperature, or even the fridge, which takes a little longer than proving in a warmer environment, improves the flavour massively. And you just let the dough do its thing while you get on with other things!
Shaping the dough:
For shaping the dough, you really need to get good surface tension so that it holds it shape as it rises free-form (or does not spread out when de-bannetonned). To do this:
(1) Pat each dough piece into a small, evenly thick rectangle on a lightly floured surface.
(2) Fold in the left and right edges to the middle and roll up away from you.
(3) Give it a quarter turn, pat down and repeat – and you should notice a marked difference in the structure of the dough.
Scoring the dough:
When slashing the dough you control where the dough splits – if you don’t slash it, the dough will split randomly as it bakes: this is not a huge problem as it will have a lovely rustic appeal. If you slash more deeply the bread will open up more as it bakes.
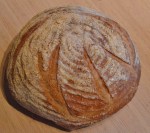
Sometimes I make one slash across the surface; at other times I made several slashes to form a pattern…(as in the pictures below for some of my sourdough loaves): but it really depends on how I feel at the time.


You do, however, need to make sure you use a very sharp knife or, ideally, a razor – if not, the blade is likely to tug at the dough and there is a risk of it deflating.
Recipe: pain de Campagne (makes 2-3 loaves)
For the pre-ferment:
- 150ml cool water
- 75g strong white bread flour
- 75g rye flour
- 1g easy-blend yeast
For the bread:
- 600g strong white bread flour
- 100g rye flour
- 10g fine sea salt
- 8g easy-blend yeast
- approx. 350ml cool water
- The day before baking, make the pre-ferment: mix the flours and yeast and mix in the water to give a fairly thick batter, cover with clingfilm and leave overnight (12 hours or so). You will end up with a mixture that resembles a spongy putty!
- The following day make the main bread dough: mix the flours and yeast together in a large bowl. Add the salt and stir in. Make a well in the centre and pour in the pre-ferment and enough water to bring together to form a wet, but not too sticky dough. Leave to stand for about 20 minutes.
- Knead for about 15 minutes by hand or 10 minutes in a machine on medium speed with the dough hook attached. The dough should be soft and elastic when it has been kneaded enough.
- Put the dough back in the bowl, cover with cling film and leave to prove at cool room temperature or the fridge for several hours (or even overnight if using the fridge) until about doubled in size.
- Remove dough from bowl, knead for a minute or two and split into two or three equal pieces. Shape each piece into the preferred shape, put in well floured bannetons, cover with cling film and prove for another couple of hours at cool room temperature until the dough has almost doubled in size and is near the top of the bannetons.
- Pre-heat the oven to its highest setting until it comes to temperature, placing a roasting tin on the bottom of the oven while it pre-heats and a baking sheet on the top shelf. Carefully turn out the dough from their bannetons onto a wooden board topped with greaseproof. Slash each with a razor along the top or the sides.
- Slide the loaf plus its greaseproof onto the hot baking sheet and put in the top of the oven. Pour a pint or so of cold water into the roasting tin. Bake the loaves for about 10 minutes at this high temperature before turning the temperature down to 200C and baking for a further 20 minutes or so until the bottom of the loaves sound hollow when tapped.
