
Although I am an unashamed bread addict, I will confess that until fairly recently I have never got excited by ciabatta; I have tried many ciabatta but have never really been blown away by the flavour – and particularly with bread, I like to be blown away!
re-photographed – June 2018
This recipe, however, is a revelation to me in terms of the flavour. It is based on Peter Reinhart’s recipe, but I have added a little rye flour for a slight nutty flavour to the bread and have slightly increased the water content, giving about 85% hydration. Sometimes, though, I take it to 90%.

Don’t be put off by the time it take to make this ciabatta*: there are actually only a few minutes of hand-on time; the rest is leaving the dough alone to prove. It is about as labour un-intensive as you can get but the trade-off for the time it takes is the most wonderful flavour.
*I sometimes make this with students at school across a couple of lessons, where time is at a premium: using twice as much yeast, mixing the dough and giving 4-5 stretch and folds (see below) in shorter intervals such as every 10 mins. Then portion off (I split up the amount below into 3-4 portions), freeze each in an airtight container before defrosting overnight in the container, emptying out gently, shaping, proving a little (skipping stage 7) and baking.
The dough
It is a wet, sticky dough initially, but the stretching and folding brings it togther, making it more manageable. See the “stretching and folding” section below.
After the very slow fermentation in the fridge, the dough will have risen to about double its original volume before getting shaped.
The risen dough will be very wobbly, but it will keep its structure if you handle it carefully as it gets shaped: well-oiled or even wet hands are the key to success here!

The stages for great ciabatta
With many breads, it is more a test of patience than skill, and while there are several stages here, each stage is very simple and each literally takes moments.
Although there are quicker recipes for ciabatta, this is the one I now stick to purely for the terrific flavour and structure you get. I really cannot urge you strongly enough to go through each of these stages for a truly artisinal bread.
The stages here are:
- mix the dough (literally just stir the ingredients together, without kneading)
- “stretch and fold” the dough a few times over the course of an hour or so
- rest the dough overnight or for a few days in the fridge
- bring the dough to room tempersture
- shape the dough
- prove the dough a little at room temperature
- turn the shaped dough onto its side
- prove the shaped dough a little more for a short time while the oven heats up
- bake

Stretching and folding – where the magic happens!
The stretching and folding simply involves:
- grabbing a handful of the dough (wet hands!)
- lift/stretch it out of the bowl and fold it back onto the main dough
- giving the bowl about a quarter-turn and repeating with another handful of dough
- do this another 2-3 times (all this takes moments!)
- rest the dough for about 20 minutes
- repeat this process, plus resting, every 20 minutes or so until you gave done this 3 or 4 more times
Although the initial dough is very lumpy, slack and almost runny, it will become smoother, tighter and more elastic with later stretch and folds: it will end up like jelly but with more structure!
You will also find the dough has strengthened enough that the entire mass of dough lifts out of the bowl in one go, which is precisely what you want.
A taste test: the slow chill or not?
- the flavour has the time to really develop
- the dough is easier to handle
- the gluten develops effectively
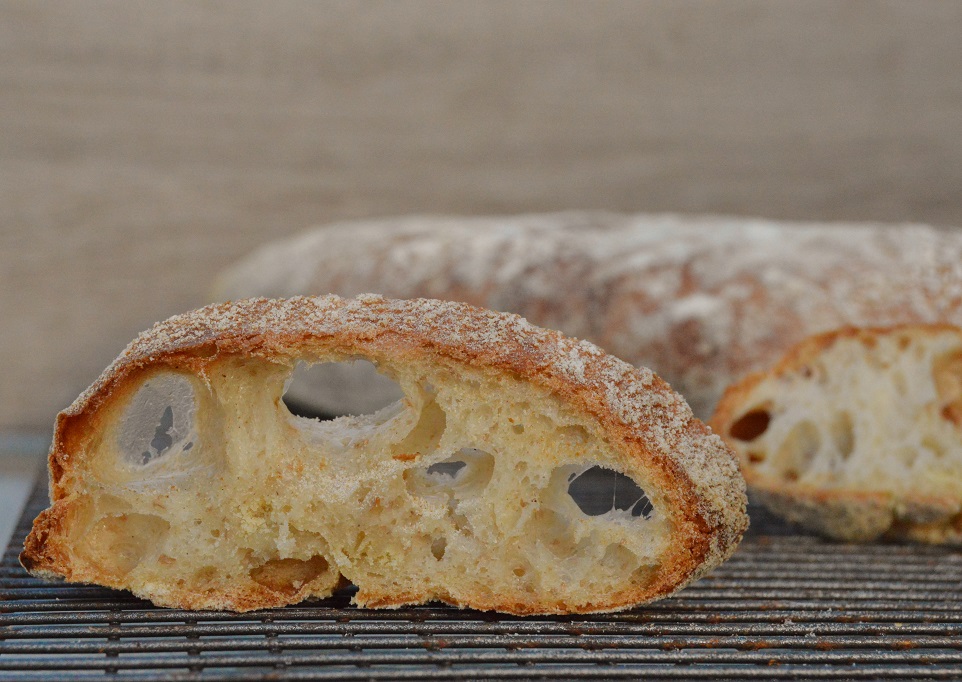
- the structure of the baked ciabatta is more open
I have baked and tasted this ciabatta both without the slow chill (using 8g easy-blend yeast, and just a few hours proving), and with the slow chill. In each case I have got friends to blind-taste.
With each taste test, the dough that had been slow-chilled was rated the better flavoured ciabatta. And the structure was much more open in terms of the holes.

Recipe: ciabatta – makes 2 large loaves or 4 smaller loaves
- 500g strong plain flour, plus extra for dusting
- 50g rye flour
- 11g fine sea salt
- 4g easy-blend yeast
- 470g cold tap water
- 30ml extra-virgin olive oil, plus extra for handling
- fine semolina for dusting and working on
(1) Mix the flours, salt and yeast together in a large bowl. Add the water and the oil and mix well to give a wet, lumpy mass. Leave to stand, uncovered, for about 20 minutes.

(2) “Stretch and fold” the dough in the bowl for a few moments using wet hands, and rotating the bowl from time to time. Cover the bowl and leave it to rest for about 20 minutes. Repeat this “stretch and fold” session 3-4 times more, resting the dough in between.

(3) Cover the bowl with clingfilm and chill at least overnight. Remove from the fridge and leave for an hour so for the dough to start to come to room temperature. Turn the dough onto a well-semolina’d surface: you will see bubbles forming over the dough.

(4) Cut the dough into two pieces and lay each piece over semolina. Taking care not to deflate the dough, lightly stretch each piece a little into a rough rectangle.
NB: wet hands, going under the dough with your fingers is easiest: the semolina mixture helps with traction.
For ciabatta rolls, cut off small pieces of the initial dough and shape each into a rough square.


(5) Fold in three (as in diagrams below) and carefully transfer, seam-side down, onto a baking sheet that has been lined with greaseproof and has been well dusted with semolina. Even though it is a soft dough, almost gelatinous in terms of its wobble, it will handle quite easily.


(6) Very gently stretch each piece of the folded dough lengthways and straighten it to form a rough rectangle, placing it near one edge of the greaseproof. It will resist a little as the gluten will have developed, but it will still be able to be stretched slightly.

(7) Dust the dough with more semolina, cover loosely with clingfilm and leave for about 30 minutes at room temperature.
(8) Gently flip each piece of dough over onto its side: you can simply lift the greaseproof along one edge to help it flop over. It will now look somewhat wrinkled in places: part of its charm!

(9) Leave to prove for a final 30 minutes at room temperature: it will have risen a little more at this stage. During this final prove, pre-heat the oven to its highest temperature and place a roasting tin on the bottom of the oven. Place a couple of baking sheets on the shelves to heat up.
(10) When the dough has had its final prove, carefully lift the greaseproof plus dough onto the very hot trays and put towards the top of the oven. Pour cold water onto the baking tray on the bottom of the oven to create steam in the oven.
(11) Turn the oven down to 200C(fan) and bake for 25-30 minutes for large ciabatta or about 15-20 minutes for smaller ones: they should sound hollow underneath when you tap them. Transfer to a wire rack to cool.

Interesting about the slow chill being preferred in your taste tests (lucky friends!) & the bonus of easier handling. Sounds like a win-win, and it certainly looks delicious!
LikeLike
thank you. Yes the slow chill really does make a huge difference. And I am up for anything that makes life that little bit easier (and nicer!) 🙂
LikeLike
This is a superb post!
I completely agree with the cold fermentation.
I use it for flat breads too. Except they are cold proofed as dough balls ready to roll out as needed. They last up to four days in the fridge kept in cheap take away food containers, one dough ball to each.
This is a superb bit of baking – I am going to make this today – Thank you.
(I will be using a sourdough leaven).
LikeLike
My pleasure Kevin. I hope you enjoyed them. The leaven is a great inclusion
LikeLike